
Halloween yard decor is the only decor your audience never walks through. Neighbors, drivers, and trick or treaters read the front lawn from the curb, in motion, at dusk, in about four seconds.
That makes the yard a stage, not a garden. It needs one focal point the street can find instantly, heights layered so the scene has depth from twenty feet away, and engineering that keeps it standing through October weather.
This cluster already runs two broader outdoor guides, and this page has a narrower job. The yard page owns the front lawn scene: its sightlines, its anchoring, its power, and its rules.
The Curb Test: Read Your Yard the Way the Street Does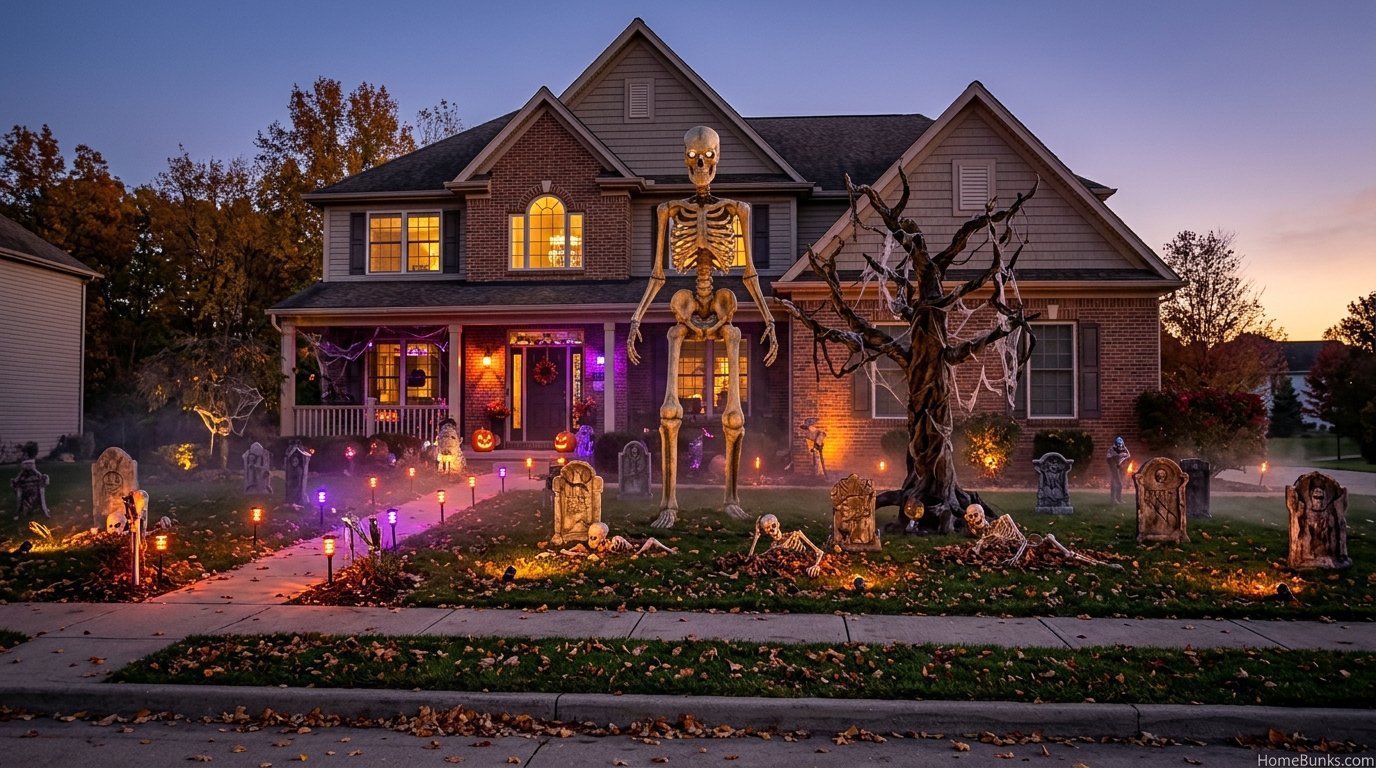
Before placing a single prop, stand at the curb at dusk and look at your own house. That view, not the view from your porch, is the product you are building.
Note where the eye lands first. It will be the brightest or tallest thing aligned with the driveway or the walk, whether you planned it or not, so plan it: that spot is your focal point’s home.
Walk the street both ways. A yard read from a moving car needs silhouette and contrast more than detail; the tiny prop you love at arm’s length is invisible at thirty feet.
Photograph the empty yard from the curb. The photo is your staging canvas, and every later decision gets checked against it before money moves.
Repeat the test after dark with the porch light on. Many yards discover their brightest object is the porch fixture or a streetlight reflection, and the focal plan quietly reorganizes itself around that fact.
Staging: One Focal Point, Heights in Layers
The anti clutter rule is one line long in the HotVerifiedDeals Halloween decorations guide: choose a central focal point and build outward using varying heights. Every successful yard in the neighborhood obeys it.
The focal point is usually the biggest thing you own: the 12 foot skeleton, a hero animatronic, or the largest inflatable. Everything else is cast, arranged to make the star read bigger.
|
Layer |
Distance From Curb |
What Belongs |
Height Role |
|---|---|---|---|
|
Front |
Curb to walkway |
Pathway lights, low tombstones, archway base |
Ground line, guidance |
|
Middle |
Walkway to mid lawn |
Ground breakers, skeletons, fog, secondary props |
Body of the scene |
|
Back |
Mid lawn to house |
The focal giant or hero piece |
Skyline, silhouette |
|
Frame |
Porch and door |
Arrival anchor, wreath, porch light |
The destination |
Perimeter thinking orders the build: stage from the street inward, placing the focal where approaching visitors look first, typically aligned with the driveway entry or the main walkway.
Vary heights deliberately within each layer. A row of same height props reads as a fence; a rhythm of tall, low, mid, tall reads as a scene with a pulse.
Scene Recipes: Three Ways to Fill the Stage
The graveyard is the grammar classic: tombstones grounded in the front layer, ground breaker skeletons rising in the middle, low fog pooling at dusk, and one tall figure or dead tree at the back. It scales from six tombstones to sixty without changing its logic.
The inflatable ensemble buys the most visual coverage per dollar, in the trends guide’s phrase. Two or three large inflatables in one family of characters, spaced so none blocks another, lit from inside, read from a block away.
The haunted approach decorates the journey instead of the lawn: an archway at the walk, lighted stakes guiding the path, scenes unfolding on both sides, and the porch as the payoff. It suits narrow yards where depth beats width.
The wider outdoor system around these scenes, roofs, side yards, and the rest of the property, lives in our outdoor halloween decor guide, which this page treats as its parent guide.
The 12 Foot Question
One product organizes this entire topic: the 12 foot skeleton, steel framed, posable, dressable, sold with lighting kits that make its chest and eyes glow.
In its ideas list, the Home Depot Halloween decoration ideas guide opens with the giant as the star of the show, with assembly video and PDF instructions attached.
Is it worth it? The trends guide’s FAQ answers yes, with the condition that matters: built on a steel frame, it holds up well against wind when properly tethered, and it becomes the focal point of the entire yard.
That condition is the whole game, and it is why the anchoring section below is the longest in this article. A giant is a sail with bones; bought without an anchoring plan, it is a kite with a receipt.
Smaller households should note the understudy: the 5 foot posable skeleton, called the most versatile prop in the research, sits on chairs, climbs rooflines, and populates graves at a fraction of the cost and none of the wind load.
Wind Is the Second Designer
October grades every display publicly. The yards still standing on October 30 are not the luckiest; they are the ones whose owners treated wind as a design input from the first stake.
Start from the failure list, because the collected engineering advice is written by people who have lost props: factory stakes pull out, unsupported torsos snap, inflatable seams tear on branches, and foam tombstones emigrate to the next street.
Every protocol below answers one of those failures specifically. None of it is expensive; all of it is cheaper than replacing a hero piece in week two.
The Anchoring Protocol for Giant Props
The deepest protocol in the research comes from the KitchenwareSets DIY Halloween house decor guide, whose anchoring build for a giant skeleton is worth adopting nearly whole:
Anchoring a giant prop, step by step:
- Assemble on flat, stable lawn, away from overhead power lines, base and legs first.
- Ditch the factory stakes. Drive heavy duty steel rebar stakes, 12 to 18 inches, deep over the metal baseplate at all four corners.
- Clamp, do not screw. Secure the feet to the baseplate with steel hose clamps instead of the provided screws for rigidity.
- Guy the torso. Attach three lengths of dark paracord to the ribcage, hidden from the front view.
- Stake the tripod. Run the guy lines out behind and to the sides, tensioned, so the torso cannot sway forward in gusts.
The principle underneath, in the guide’s own framing: anchor at the base and the midpoint. A heavy base prevents tipping, but wind will snap a tall spine whose torso is unsupported, however solid its feet feel.
Apply the same logic down the size range. Animatronics get tent stakes or sandbag ballast at the base and a mid height tether where the design allows; nothing tall stands on hope.
Inflatables Are Sails: Tethers, Ballast, and Intake Care
An inflatable is a fabric sail with a fan, and the planning literature treats it that way: above sustained winds around 25 miles per hour (one planning guide’s figure, held as a strand), seams and motors are at risk and deflation is the correct move.
Every tether point the manufacturer sewed in gets pinned, not just the convenient two. In high wind yards, add sandbag ballast around the internal base.
Placement prevents the slow failures: clearance from branches that snag and tear the shell, nothing sharp nearby, and spacing so neighbors do not rub or block each other.
Setup order matters too, per the retailer guide: position the base where it will stand, spread the fabric flat, close every zipper and vent, and keep the fabric away from the fan’s intake side while it fills.
The intake is the inflatable’s lungs: a fan at the base that must stay clear of obstructions, including its own fabric, leaves, and mulch. A starved intake is the usual suspect when an inflatable will not stand tall.
Tombstones and Small Props: The Dowel Fix
Foam tombstones ship with pegs that October laughs at. The fix from the trends guide’s FAQ is workshop simple: tape wooden dowels or rebar stakes to the back of the stone and press them about six inches into the soil.
Group stones at slight angles, the way real cemeteries lean, rather than in parade rows. The irregularity reads as age from the curb and hides the odd stake completely.
Small props follow the same rule at their scale: if it can blow, it gets a stake, a weight, or a tether. The graveyard you find in your yard on November 1 should be the one you built, not the one the wind edited.
The Storm Night Routine
Forecasts turn anchoring into a schedule. On a storm night warning, run the routine before dark: deflate the inflatables, check every guy line’s tension, and lay down anything tall that cannot be secured further.
After the storm, walk the yard before re-inflating. Seams, intakes, and cord connections are inspected in daylight, when damage is visible and fixable.
Keep a small storm kit with the display: spare rebar, paracord, clamps, and zip ties in one bucket. The fix you can make in ten minutes at dusk is the display saved; the one needing a store run is not.
Add a mid season inspection to the calendar as well, around the second weekend. Stakes loosen as soil dries and rewets, guy lines stretch, and intakes collect leaves, and twenty minutes with the kit restores the setup Saturday standard before small drifts become failures.
Power and Paths Before Props
Draw the power map before placing props: where the outdoor outlets are, which borders the cords will follow, and where the single unavoidable crossing sits. Props then arrange themselves around the infrastructure instead of against it.
Route cords along borders, fences, and edges, never arbitrarily across the lawn, and put a heavy duty outdoor cord protector wherever a cord must cross a walking route. Trip hazards are how a great display becomes a bad story.
Rain rules are simple and strict: electronic animatronics handle heavy rain poorly, so motor units live covered, under porches where possible, or inside weatherproof junction boxes, per the trends guide’s care advice.
Mind the total load as the display grows. Giants, fans, fog machines, and lights add up across one outdoor circuit faster than enthusiasm expects; spread loads across outlets and put the whole show on timers so it sleeps when the street does.
The Walkway Is Sacred: Trick or Treater Flow
Your audience includes hundreds of small people in costumes with limited vision, walking your path in the dark, carrying bags. The walkway is a safety system that happens to be decorated.
Measure it honestly: props never pinch pedestrian access, block stairs or handrails, or crowd the door swing. Light the path itself with stakes or luminaries so the route reads clearly from the street.
Keep the scare placement fair: motion triggered props belong beside the path, visible before they fire, not hidden at ankle height across it. The goal is delighted shrieks, not a fallen vampire with a skinned knee.
The arrival the path leads to is the porch, and our halloween porch decor guide takes over exactly where the walkway ends, so the journey and the destination are designed by the same system.
Light After Dark: The Dusk Transformation
A yard display has two shows: the daytime arrangement and the night transformation, and the second is the famous one. Judge every lighting choice at dusk, from the curb, in the dark your audience gets.
Layer light the way the planning guide teaches: ambient glow from string and pathway lights for readability, one targeted spotlight angled upward into the focal piece for the shadow drama string lights cannot make, and internal light inside inflatables and the giant’s chest.
Color discipline keeps it eerie rather than carnival: one or two light colors across the whole scene, usually in the green, purple, orange family, with the porch light warm and honest at the destination.
Do the drive by test at full dark. If the focal point does not win the first glance from a slow car, the lighting, not the props, is what needs buying.
Rules and Timing: Step Zero
Before the first stake, run the check the retailer guide itself prints: review local laws and neighborhood guidelines that restrict when holiday decorations can be displayed.
That advice arrives with a timing tip in the Home Depot Halloween decoration ideas guide: set up at the beginning of October to get the season’s full value.
HOA rules typically govern some mix of display windows, inflatable hours, noise, and how long after the holiday things must come down. Municipal rules care about sightlines at corners, sidewalk obstruction, and occasionally signage.
Neighbor diplomacy is the unwritten layer: a brief word with the closest households, sound kept reasonable, and lights on timers that end at a civilized hour buys more freedom than any rulebook grants.
Safety and cost angles for the wider outdoor picture, beyond the lawn, are covered in our halloween outdoor decor guide, which pairs with this page’s rules section.
Small Yards and Corner Lots
Small yards win by subtraction: one giant or hero piece, one mid layer, one ground line, and nothing else. A tight scene staged in three depths beats a crowded one at any budget, because the curb reads clarity first.
Use the house as the backdrop the big yards lack. A focal piece close to the facade gains the wall as scenery, and window silhouettes join the show for free.
Corner lots have two streets and therefore two curb tests. Stage the corner itself as the focal zone, readable from both approaches, and let the two frontages run simpler supporting layers.
Renters and no dig households anchor with weight instead of penetration: sandbags, water filled bases, and clamp to existing structures where permitted, accepting slightly lower wind ratings as the honest trade.
Cute Yards and the Kids Hour
Not every yard wants dread. The inflatable ensemble in friendly characters, a smiling skeleton crew, and warm pathway light build the cute register at full yard scale.
The cluster’s own soft style system translates directly outdoors, and our cute halloween decor guide works in faces and pastels that read from the curb exactly because they are simple and high contrast.
Mixed streets run the kids hour compromise: the full friendly show until the small trick or treaters thin out, then the fog, sound, and scarier animatronics join for the older crowd. One yard, two intensities, scheduled like the parties indoors.
Theft, Vandalism, and the Lawn Itself
Big pieces are valuable and visible, which invites the topic nobody enjoys: theft. Cable the hero pieces to their anchors or a fixed point, bring small valuables in overnight if your street’s history says so, and let timers kill the show late, since a dark yard advertises less.
A camera or a simple sign noting one changes the calculation for opportunists. Insurance photographs of the full display, taken at setup, cost two minutes and settle every later argument.
The lawn pays for October too: expect yellow patches under big bases, ruts in wet soil, and stake holes everywhere. Move heavy bases weekly where practical, and plan the November repair, aeration and seed on the worn spots, as part of teardown rather than a spring surprise.
Teardown and Storage: The Display’s Second Life
Teardown is setup in reverse with better information. Photograph the finished display from the curb first; next year’s staging starts from those pictures, not from memory.
Dry everything before it is boxed: inflatables stored dry against mold (the care guides are blunt on this), fog machines drained per their manuals, lights wrapped around cardboard spools or reels so next October opens without the tangle ritual.
The giant stores in its sections, hardware bagged and taped to the frame it belongs to. The anchoring kit, rebar, clamps, paracord, lives in its own labeled bucket, because it is a system, not spare parts.
Close the loop with the calendar: November’s clearance is when next year’s focal piece is bought, tested in the yard on a calm weekend, and stored with this year’s kit. The sale guide in this cluster exists for exactly that purchase.
Start the whole system from the guides gathered on our HomeBunks home page, where the yard, outdoor, porch, and party pages sit together.
Measure First: The Paper Plan
Draw the yard before buying for it: a rough rectangle with the house, walk, driveway, trees, and outlets marked. Giants have footprints and swing radii; the drawing discovers collisions on paper, where they are free.
Measure the two distances that govern everything: curb to facade, which sets your layer depths, and walkway width, which is legally and morally untouchable. Write both on the drawing; every purchase gets checked against them.
Mark the power sources on the same sheet. Most yards have fewer outdoor outlets than the display wants, and discovering that in September is planning; discovering it on setup Saturday is a crisis with extension cords.
Budget Tiers for a Yard That Grows
Tier one, the ground layer: pathway lights, a handful of tombstones with the dowel fix, and one posable skeleton. Under a modest budget, staged in three depths, it already beats most scattered yards on the street.
Tier two, the hero: one giant or hero animatronic with its full anchoring kit, bought as a pair, never the prop alone. The kit money is not optional garnish; it is half the product.
Tier three, the system: fog, layered lighting with a real spotlight, a second scene zone, and timers running the show. Reach this tier across two or three seasons, letting November clearance fund each step.
The tiers share one rule: finish a tier before starting the next. Three complete shallow scenes lose to one complete deep one from every curb on the street.
Sound and Motion: The Event Layer
Motion is the yard’s punctuation: one or two triggered pieces beside the path, placed where visitors see them before they fire. A yard where everything moves constantly has no events, only noise.
Sound follows the neighbor rules: a small speaker near the porch, volume judged from the sidewalk and the neighbor’s porch, not from beside the speaker, and silence when the timers end the show.
Program the escalation if your pieces allow it: stillness, then light, then motion as visitors commit to the walk. The sequence is what turns a display into a tiny haunted attraction with a beginning and an end.
The Second Story: Roofs, Trees, and Windows
The yard’s frame includes everything above the lawn: a skeleton crew member climbing the roofline (the versatile 5 footers again), a ghost in the big tree, silhouettes in the upstairs windows.
Height is the cheapest drama in the topic, because the street reads the skyline first.
One figure above the roofline can do the focal work of three pieces on the ground, provided it is secured like it matters, since falls from height are the one failure with real consequences.
Trees take hanging pieces well when the anchor is the trunk or a major limb, never a twig, and when the piece can swing without sawing its own line. Check chafe points after the first windy night.
Windows join from inside: a backlit silhouette costs almost nothing, needs no weatherproofing, and reads from two blocks away. Coordinate its color with the yard’s palette so the house and lawn tell one story.
The Setup Weekend Schedule
Saturday morning is infrastructure: power map walked, cords routed and protected, focal base assembled and its rebar driven while the ground and the crew are fresh.
Saturday afternoon is the build upward: the giant raised and guyed with help (two people minimum for anything near full height), mid layer placed, tombstones dowelled, inflatables test inflated and their intakes checked.
Sunday is calibration: scenes adjusted from the curb, walkway measured one last time, timers set, insurance photographs taken, and the storm kit bucket placed where the routine needs it.
First dusk is the premiere and the audit: the drive by test at full dark, the spotlight re-aimed, and the fix list written while the yard is still young enough to change.
Setup that ends with a written fix list is how second years get better than first ones.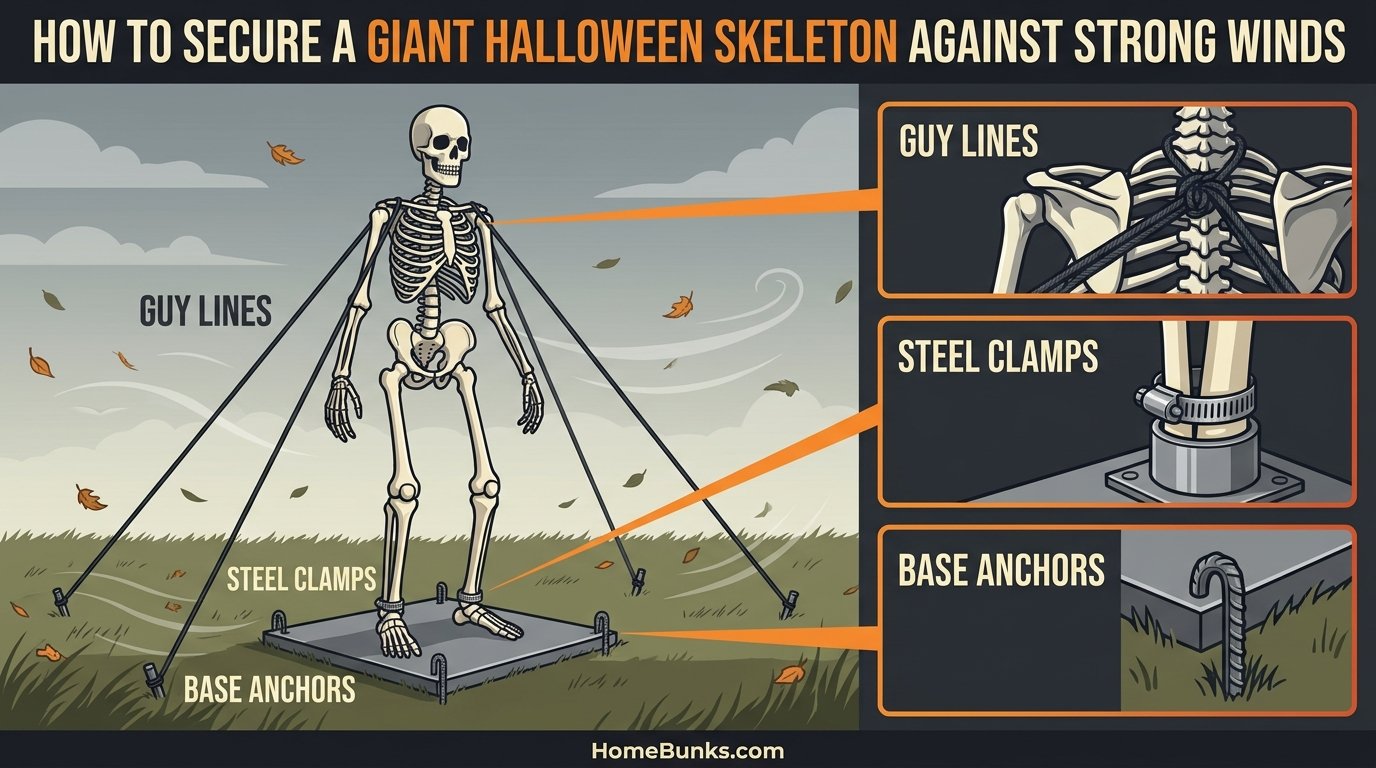
Frequently Asked Questions
1. How do I decorate my yard for Halloween?
Start from the curb, then stage one scene. Stand at the street at dusk, pick one focal point aligned with the walk or driveway, layer heights in three depths, anchor everything, and light it after dark.
2. What is the best focal point for a Halloween yard?
The biggest readable piece you own. Usually the 12 foot skeleton, a hero animatronic, or the largest inflatable.
Everything else is cast arranged to make the focal piece read bigger from the street.
3. Are 12 foot skeletons worth it?
Yes, when it is properly tethered. The steel frame holds up well in wind when anchored, and it becomes the focal point of the whole yard.
Bought without an anchoring plan, it is a risk, not a bargain.
4. How do you secure Halloween decorations from wind?
Upgrade the hardware and add guy lines. Rebar stakes instead of factory pegs, sandbag ballast, and paracord guy lines tensioned in a tripod for tall pieces.
Anchor the base and the midpoint both.
5. How do I anchor a 12 foot skeleton?
Follow the protocol. Assemble on flat lawn away from power lines, drive 12 to 18 inch rebar over the baseplate corners, clamp the feet with hose clamps, and guy the ribcage with three tensioned paracord lines.
6. Why are factory stakes not enough for yard decorations?
They pull out and they bend. Factory pegs are sized for calm product photos, not October gusts.
The anchoring research replaces them with rebar because pulled stakes are the first failure in almost every lost display.
7. How do I keep Halloween inflatables from blowing away?
Pin every tether and add ballast. Use all the sewn in tether points, stake them with real stakes, and add sandbags around the internal base in windy yards.
Clear branches that can snag the shell.
8. What wind speed is too much for Halloween inflatables?
Around 25 miles per hour sustained, treat it as the limit. That figure is one planning guide’s strand, not a universal standard.
Above it, seams and motors are at risk and deflating is the correct move.
9. How do I keep an inflatable’s fan intake clear?
Keep the base fan’s surroundings empty. The intake sits at the bottom.
Leaves, mulch, and the inflatable’s own fabric starve it.
Position the base, spread the fabric flat, and check the intake while it fills.
10. How do I keep tombstones from blowing away?
Back them with dowels or rebar. Tape wooden dowels or steel stakes to the back of foam stones and press them about six inches into the soil.
Angled groupings hide the fix and read as age.
11. How do I protect animatronics from rain?
Cover the motor, or move it under cover. Electronic animatronics handle heavy rain poorly.
Weatherproof junction boxes, water covers over power boxes, or a covered porch placement are the research’s three answers.
12. When should I put up Halloween yard decorations?
The beginning of October. That is the retailer guide’s own timing tip, paired with checking local display rules first.
Early setup also leaves weekends for anchoring fixes before the big night.
13. Are there rules about Halloween yard displays?
Often, yes. HOAs and municipalities may govern display windows, hours, noise, and teardown deadlines.
The retailer guide itself tells decorators to review local laws and neighborhood guidelines before setting up.
14. How do I run power cords safely in a yard display?
Route along borders, protect at crossings. Keep cords on lawn edges and fences, use heavy duty protectors where they cross walking routes, cover connections, and spread the total load across outlets with timers.
15. How do I keep trick or treaters safe in my yard display?
Keep the walkway measured, lit, and fair. Nothing pinches the path or blocks stairs, the route is lit from the street, and motion props sit beside the path where they are seen before they fire.
16. What is the best Halloween yard scene for a small yard?
Subtract. One hero piece, one mid layer, one ground line, staged in three depths against the house as backdrop.
A tight, clear scene reads better from the curb than a crowded one at any budget.
17. How do I stage a corner lot for Halloween?
Stage the corner itself. A corner lot has two streets and two curb tests.
Put the focal zone at the corner, readable from both approaches, and run simpler supporting layers along both frontages.
18. How many decorations does a front yard need?
Fewer than instinct says. One focal, a mid layer, and a ground line fill most front yards.
Clutter is the common failure; if a piece cannot be seen from the curb, it is not earning its place.
19. Inflatables or animatronics, which is better for a yard?
It depends on the job. Inflatables give the most coverage per dollar and the easiest setup; animatronics give motion and event.
Many strong yards use one of each at different layers rather than choosing a camp.
20. How do I stop my yard from looking cluttered?
Impose the focal rule. One central piece, everything else building outward with varying heights.
Remove pieces until the curb view has one clear first glance, then stop adding for the season.
21. What do I do with yard decorations when a storm is coming?
Run the storm routine before dark. Deflate inflatables, check guy line tension, and lay down tall pieces that cannot be secured further.
Inspect seams, intakes, and connections in daylight before re-inflating.
22. Should I deflate inflatables every night?
Not necessarily every night, but in wind and rain, yes. Calm, dry nights can run on timers.
Forecast gusts or storms mean deflation, because a collapsed inflatable dragged by wind damages seams and motors.
23. How do I light a yard display after dark?
In layers, judged at dusk. Ambient glow for readability, one spotlight angled up into the focal piece for shadow drama, internal light in inflatables and giants, and one or two colors across the whole scene.
24. Do yard decorations need a timer?
Strongly recommended. Timers run the show on schedule, end lights at a civilized hour for neighbors, and cut the nightly outlet routine.
Smart plugs add weather aware control for inflatables.
25. How do I prevent theft of expensive yard decorations?
Make the big pieces heavy to move. Cable heroes to anchors or fixed points, bring small valuables in overnight where the street’s history warrants it, photograph the display for insurance, and let timers darken it late.
26. Will a Halloween display damage my lawn?
Lightly, and repairs are part of teardown. Expect yellow patches under bases and stake holes in the lawn.
Move heavy bases weekly where practical, and aerate and seed worn spots in November.
27. How do I store a 12 foot skeleton?
In sections, with its hardware attached. Bag the bolts, clamps, and stakes and tape the bag to the frame section they belong to.
The anchoring kit stores as its own labeled bucket system.
28. How do I store Halloween inflatables without mold?
Dry them completely first. Mold is the storage failure the care guides warn about.
Spread inflatables until fully dry, coil their cords, and store them out of damp basements where possible.
29. Can I leave yard decorations up in the rain?
Sturdy pieces can, electronics should not. Static props and the skeleton shrug off rain; animatronic motors and inflatable fans need covers, junction boxes, or a storm night inside.
Check connections after any soaking.
30. What is a ground breaker skeleton?
A skeleton that bursts from the ground. Waist up figures, often just torso, arms, and skull, planted to look like they are climbing out of the lawn.
They are the graveyard scene’s classic middle layer.
31. How do I build a front yard graveyard scene?
Ground it in layers. Tombstones front, ground breakers and rising skeletons mid lawn, low fog at dusk, and one tall figure or dead tree at the back against the house.
Anchor every layer as you build.
32. What are guy lines for Halloween decorations?
The ropes that hold tall props upright. Paracord lines attached at a prop’s midpoint and staked out behind and to the sides in a tripod, tensioned so wind cannot sway or snap the piece.
33. How deep should stakes go for yard decorations?
Deeper than the box suggests. Rebar at 12 to 18 inches for giant baseplates, tombstone dowels about six inches into soil.
Soft or wet ground argues for the longer end of every range.
34. Can renters decorate a yard for Halloween?
Yes, with weight instead of digging. Sandbags, water filled bases, and clamps to permitted structures replace stakes.
Accept slightly lower wind ratings, and confirm the lease and any HOA rules first.
35. What is the cheapest high impact yard decoration?
Usually the pathway and ground layer. Lighted stakes, luminaries, and a few tombstones transform a walk for very little.
The most versatile single prop per the research is the posable 5 foot skeleton.
36. How do I make my yard scary but safe for little kids?
Design the route, then schedule intensity. A lit, clear walkway, friendly pieces near the path, scares visible before they trigger, and a kids hour with fog and sound joining later for older visitors.
37. When do Halloween yard decorations go on clearance?
Right after Halloween, in early November. Retailers clear seasonal stock hard once the day passes.
Test any clearance giant in the yard on a calm weekend before storing it for next year.
38. How do I plan a yard display on a budget?
Start with the staging rules, they are free. The curb test, focal rule, and layering cost nothing.
Then one hero piece, a ground layer, and lighting, bought in that order across one or two seasons.
39. What should I check before buying a giant yard prop?
Check the frame, the fan or motor, and the return terms. For giants, confirm the footprint and storage sections fit your space.
For inflatables, the intake design and tether points decide wind survival.
40. How do I add fog to a yard display safely?
Low, still, and supervised. Low lying fog works best on calm evenings with the machine placed so fog drifts across the scene, away from the walkway’s footing, and never where it hides path edges or steps.
41. Do I need permission from my HOA for a yard display?
Check before assuming either way. Some HOAs govern inflatables, hours, and display windows; others are silent.
The retailer guide’s advice stands: review the rules that apply to your street before setup weekend.
42. How do I take down a yard display efficiently?
Work the photograph in reverse. Photograph the display first, then take layers down back to front, dry everything, bag hardware to its pieces, and finish with lawn repair while the stake holes are easy to find.
Conclusion
Halloween yard decor succeeds when the stage and the engineering are designed together from the first stake.
Stand at the curb first. One focal point, three depths, and a scene the street can read in four seconds of dusk is the whole staging discipline.
Anchor like October is coming. Rebar over factory stakes, guy lines at the midpoint, every tether pinned, and the storm routine scheduled, because wind grades every display in public.
Run power and paths before props. Cords on borders, protectors at crossings, the walkway measured and lit, and the rules checked before the first purchase hardens into a violation.
Close the loop. Dry storage, a labeled hardware bucket, photographs of the finished scene, and the November clearance giant tested for next year turn one good October into a system that improves every year.
Start the staging with the guides on our HomeBunks home page, run the curb test this weekend, and let the street tell you where the giant goes.


